+ |
 |

from
+ |
|
JS Widget can easily integrate into your Shopify forms and validate your emails prior to form submission.
What do you need before starting?
Which forms and fields are protected?
Here is a step-by-step guide on how to integrate DeBounce into your Shopify forms.
Navigate to https://app.debounce.io/api and create an API key, then copy the public API key.
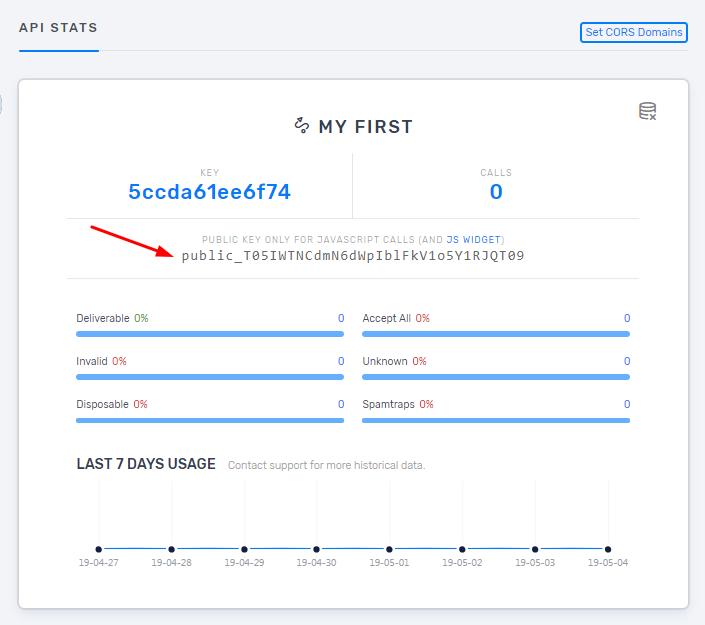
Next, you need to add your domain URL to the approved domains list. This is a security factor that only enables the widget on your specific domain. Click on "CORS Domains" and add your website address. Please note that the CORS URL must follow these rules: 1) It is not sensitive to HTTP and HTTPS; 2) It is sensitive to www and non-www; 3) If your webpage is on a subdomain, you must add the subdomain too; 4) You must enter the root URL of your webpage. Some possible examples: example.com, my.example.com, www.example.com.

Add your public API key into the following code. The integration code is now ready. You only need to add it to your Shopify page.
<script type="text/javascript">
DeBounce_APIKEY = 'YOUR_PUBLIC_API_KEY_HERE';
DeBounce_BlockFreeEmails = 'false'; //Set this value true to block free emails like Gmail.
</script>
<script async type="text/javascript" src="https://cdn.debounce.io/widget/DeBounce.v2.js"></script>