Having a custom domain for your business emails adds a level of professionalism and credibility that generic email addresses like gmail.com or outlook.com cannot match. A custom domain helps establish your brand identity and makes it easy for clients and colleagues to remember your email address. If you are ready to make the switch from free consumer email services to a paid business email hosting solution, setting up custom domain emails with G Suite or Office 365 is a straightforward process. In this step-by-step guide, we will walk through verifying ownership of your domain name, adding email users within your Google or Microsoft account, and ensuring all the necessary DNS records are in place so emails can be delivered to and from your custom domain addresses.
Preparations
As a business, if you are ready to get a custom email address, you must know the right steps to pick one. Doing so ensures you get the right service for your business.
Register Your Domain
When choosing your domain, the domain availability and domain provider or registrar are the very first things you look out for.
You can check the availability on any platform, but you should register it with a reliable, secure company that offers the best pricing.
Remember, not all companies can register all types of domain extensions, in which case your options are very limited. Common domains like .com, and .net could be registered with almost any domain registrar.
The process is quite simple:
- Go to any domain registrar like Godaddy, Namecheap, etc
- Search for your domain name
- If the name you want is taken, you can always differentiate yourself by adding extra symbols. These can be dashed or even changes to the domain extensions – instead of .com, you can use .co or .org, among others.
Pro-tip for creating custom domain emails:
Today, it’s very easy for scammers to copy emails and make slight alterations to mimic an entity. So, having a recognizable email format protects your business reputation and integrity while ensuring your customers are safe.
For instance, you can set your emails to [email protected]. This format incorporates the use of first and last name as the email identity followed by the company name as the domain. Moreover, the entire email uses small letters. So, an email that reads [email protected] can easily be flagged as the format is inconsistent.
Setup Custom Domain with G Suite
G Suite, or Google Workspace, offers a full suite of services for creating custom email domains. After all, this collaboration and business management tool is built to cater to businesses that want to collaborate remotely in a cloud-based setting.
When setting up your company's email, you can even incorporate a professional logo design into your email signature for a polished and branded look.
In addition to offering custom professional email domains, you also get access to digital tools. These include adequate storage space, calendar sharing, and even team video conferencing capabilities. You also get access to apps, such as Google Docs, Sheets, and Slides. Moreover, G Suite offers website hosting services. Here’s how to set up custom email domains with G Suite;
Step 1: Creating a G Suite Account
To set up Google Workspace custom email domains, you must first create a Google Workspace account. Once you log into your new G Suite account, you can work on the email setup wizard to add more email accounts for your team. As part of the setup, you must confirm whether you have a domain name.
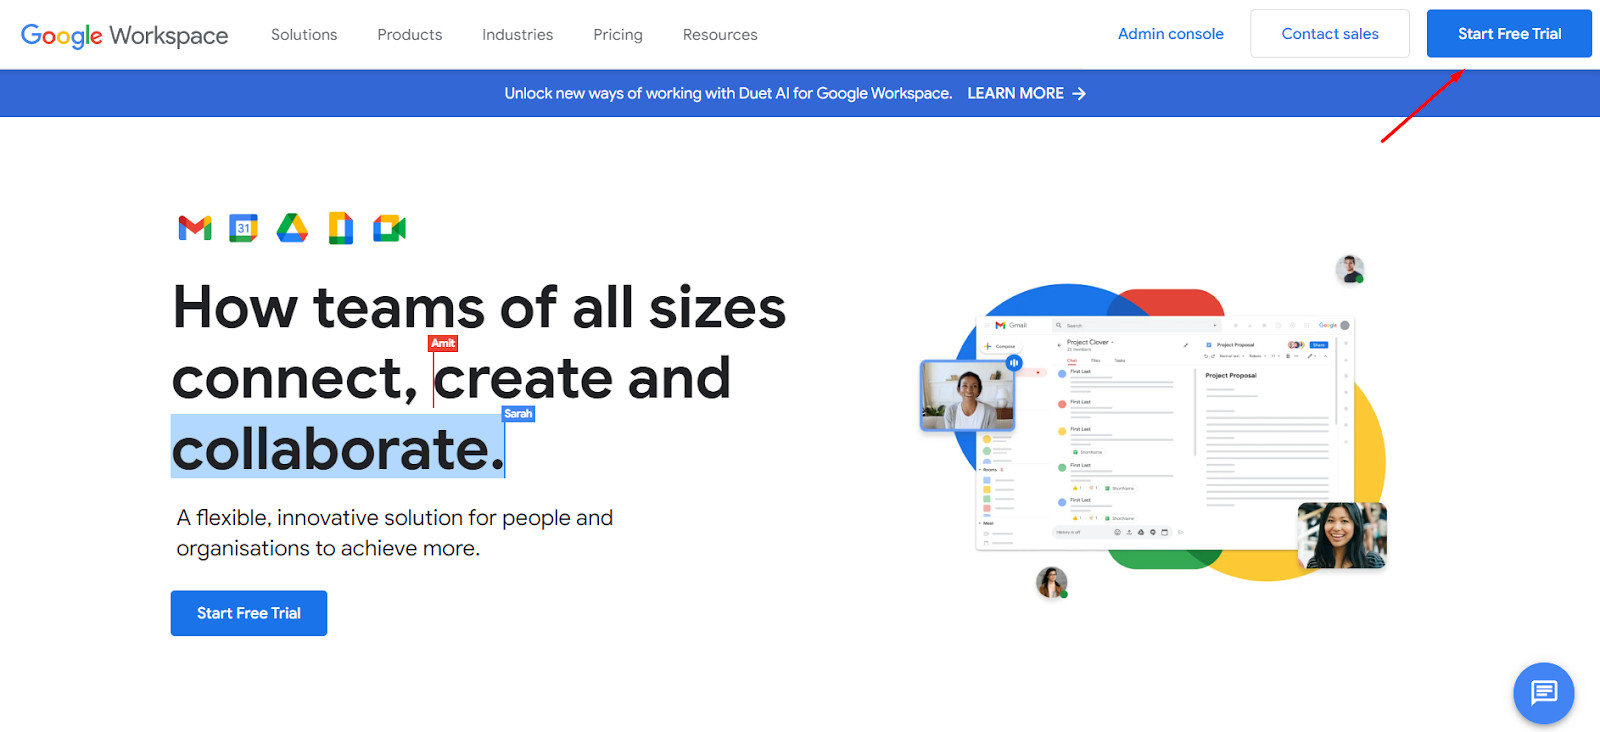
On the basic settings, Click on Yes, I Have One I Can Use if you already have a domain name. You can then proceed to share your domain details. To complete the setup, add a secondary or recovery email address, and create a username, and password. Finally, you can confirm the account setup by Clicking on Agree and Create Account and proceeding to Go To Setup. After creating your account, you can start to add your team member’s email addresses.
Step 2: Adding Your Custom Domain
This step involves adding a domain name that you want to use for your emails. Just enter your domain name and move to the next step, which is the verification process.

Step 3: Domain Verification Process
When you choose the domain verification option, you can easily find instructions on verifying your domain. Retrieve your domain name from your provider’s account dashboard and add the TXT record to your domain registrar or web hosting account. Once you confirm the process and verify your domain name, you can move to the MX records step.

Step 4: Setting Up MX Records
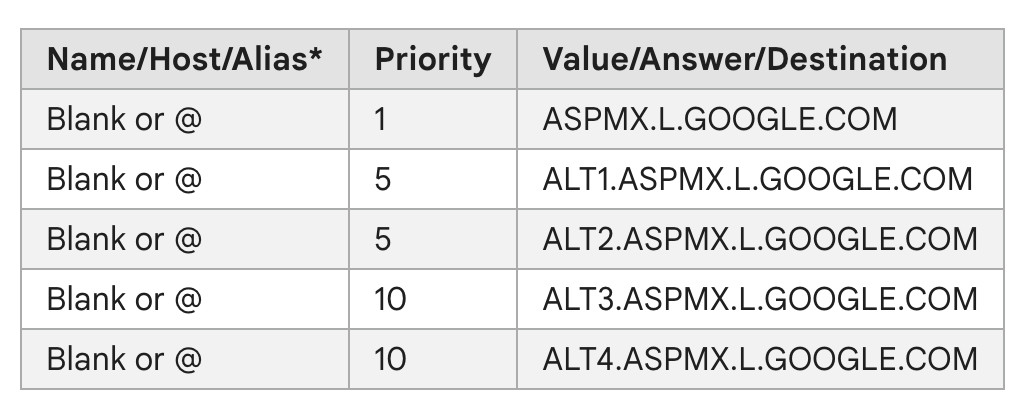
MX Records or mail exchange records are DNS records that direct emails to specific mail servers – pointing to the IP addresses of mail server domains. MX records are essential for differentiating web and email servers if you host or lease your email.
To add MX records on G suite, go to the DNS section of your domain registrar and find the MX records creating and editing section. Once here, replace all information on the MX record entries with details you will find on your Google Workspace wizard.
Then, return to your Google Workspace set-up interface and click on Verify Domain And Set Up Email. After confirmation, you will receive an email that confirms your email setup is complete and live.
Step 5: Adding User Accounts and Creating Email Addresses
Once done, you can return to your Google Workspace account dashboard and start to add email accounts.
Step 6: Adding SPF Record & DKIM
Setting up both SPF and DKIM records is important to avoid landing your mail in a spam folder in your recipients inbox. In simple words, they provide confirmation to the recipient that the email originated from your server.
Setting up SPF is pretty simple:
Add a new txt record in your DNS settings on your domain:
Host: @
Value: v=spf1 include:_spf.google.com ~all
TTL: Default value
Click save.
Setting up DKIM requires following these steps:
Go to Apps > Gmail > Email authentication
- Click on Generate record
- Create a new txt record in Domain dns manager and enter the provided Host name and record value
- Come back to Google workspace and click on verify
Remember, it can take up to 24-48 hours for the DKIM to verify.
You are all set to send and receive emails through your profession's custom domain email.
Setup Custom Domain with Office 365
Office 365 offers incredible desktop and mail tools, including email hosting and a free domain for up to a year. This means that the domain name is exclusive to you and can be used to create custom emails for every license. You also get a range of other resources, including malware protection, restricted email forwarding, and responsive customer support. Plus, you enjoy access to Microsoft tools, such as Excel, PowerPoint, and more. Here’s how to create custom domain email with Office 365;
Step 1: Creating an Office 365 Account
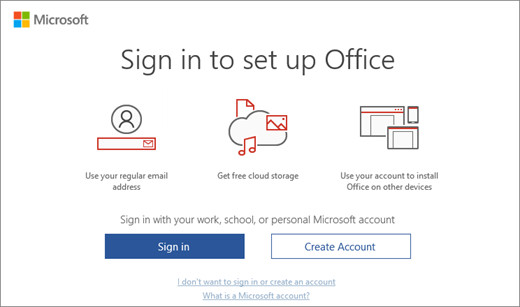
Go to the Microsoft 365 website and create an account. If you don’t already own a domain name, register and purchase one with a provider of your choice.
Step 2: Adding Your Custom Domain
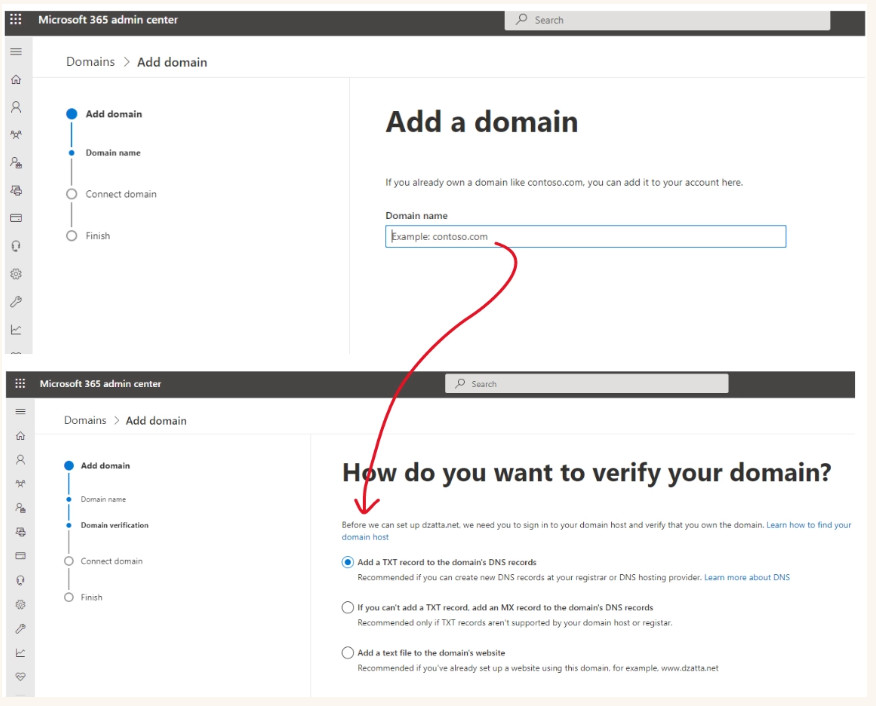
Log into your Office 365 account and follow the setup wizard instructions to configure your account. Next, go to the Add Domain section and click on Yes, add this domain now. Type the domain name and confirm by clicking on Use This Domain. Once done, you will be directed to the domain verification section.
Step 3: Domain Verification Process
If you have a live website, choose the bottom option that lets you Add a text file to the domain’s website. If not, choose Add a TXT record to the domain’s DNS records and copy TXT records. Then, head to your domain registrar or web hosting service by logging into your provider’s account and finding the Domain Name System (DNS) management settings on the dashboard.
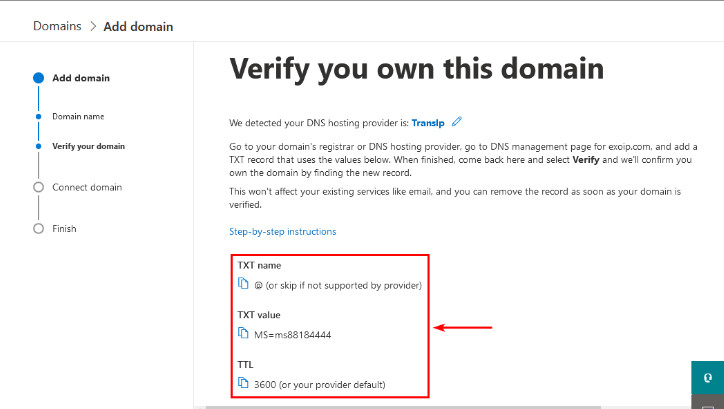
Next, head to a section that lets you add or edit custom DNS records. This is where you will find the TXT records. In the TXT section, add the values you previously copied to complete the verification process.
Once done, go back to the Office 365 setup wizard and click on Verify. Once you complete the verification, you can start to add other custom emails to your team. Alternatively, you can continue with the setup process and add the user accounts and email at the end.
Step 4: Updating DNS Records
This step links your domain to Microsoft serves and configures online services. In short, it allows your custom emails to work with your domain name effortlessly. Updating MX records ensures emails will be delivered to Microsoft servers, i.e. into your custom domain email address inbox.
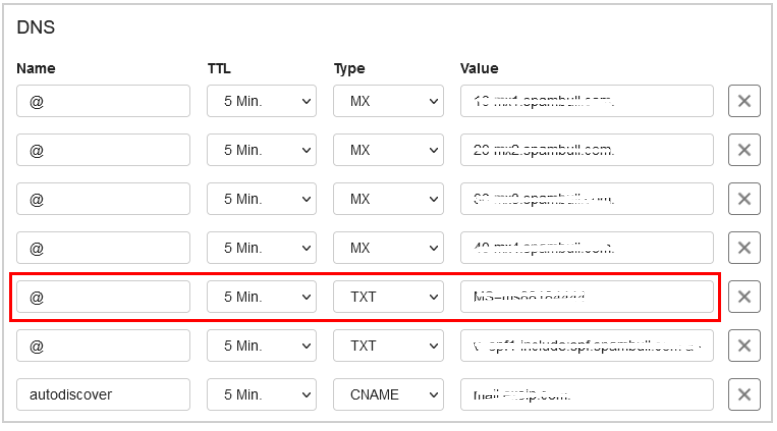
Head to your registrar or web hosting provider’s control panel and find the MX records creating or editing section (it is usually listed under the Mail section). Follow DNS records updating instructions provided by Office 365 that are relevant to your provider to fill out the fields. Delete existing MX records and then save the changes.
Head to the Domains section, click Add a Custom DNS Record, select CNAME, and add values based on Office 365 instructions. Repeat the same steps for SRV records.
Lastly, find the edit nameservers option on the Domains section of your registrar or web hosting dashboard. Update at least two records (they can be found on your Office 365 setup wizard in the connect domain section) with those provided by Office 365. It may take up to 30 minutes for this process to complete. Once done, click on Continue on the Office 365 setup wizard to complete the configuration process.
Note: Office 365 automatically updates DNS records if you use select domain providers. These include WordPress.com, GoDaddy, Plesk, Media Temple, Cloudflare, EuroDNS, and 1&1 IONOS. Click on Set up my online services for me to fill out the relevant fields and click Continue automatically. Choose services you want to use or integrate into your Office 365, click on Continue, click on Import DNS Records, or do so manually by clicking on Add Records (you can find DNS records in your domain registrar dashboard under the Domains settings).
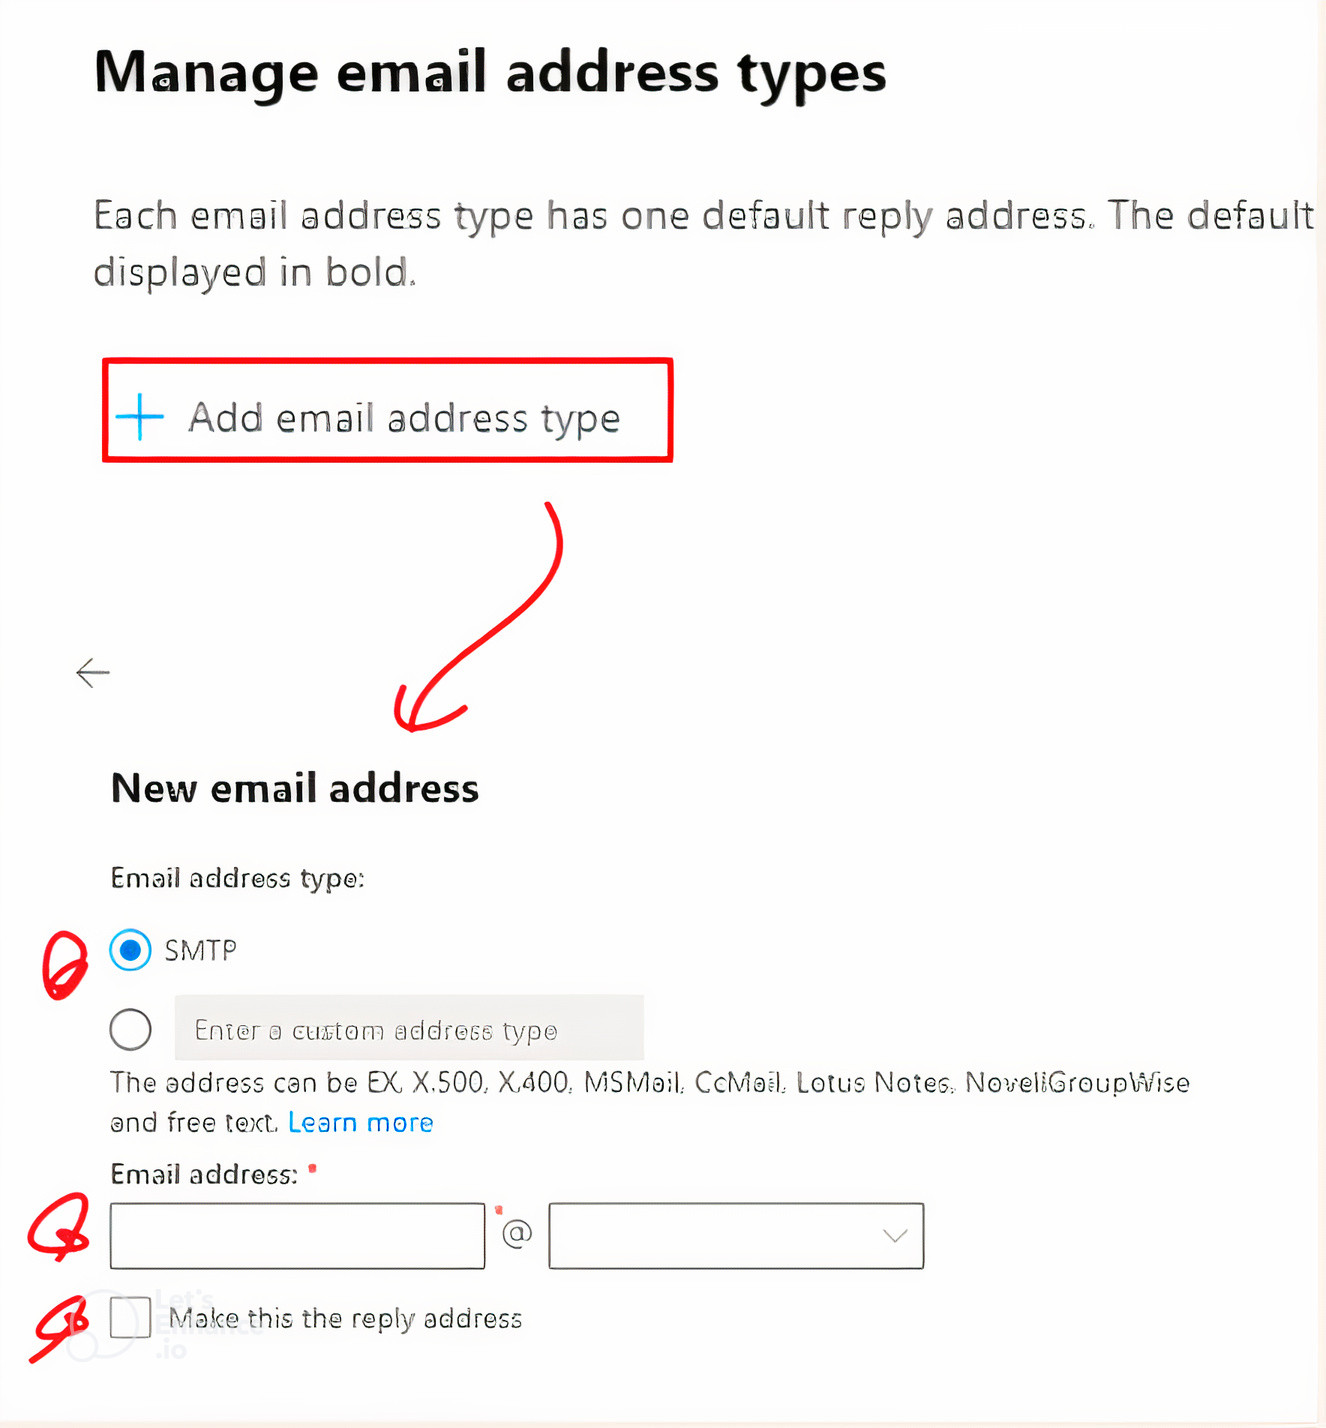
Step 5: Adding User Accounts and Creating Email Addresses
Once done updating the DNS records, you can return to your Office 365 dashboard and start to add user accounts and email addresses.
Migration of Existing Email Data
Most domain providers will allow data backup and migration capabilities. So, if you already had existing professional custom emails and wanted to change the provider, you don’t need to start afresh. You can back up or migrate data and continue where you left off.
Backing Up Existing Emails (if applicable)
Once you create custom email addresses with Google Workspace, you can back up existing emails. Google Workspace email archiving feature enables you to retain data for litigation and compliance needs.
But, the availability of this feature is highly dependent on the package you choose. You can also take advantage of Google Workspace backup tools with fully automated backup and restoration capabilities for Gmail, Google Drive, Contacts, and other G Suite apps you may use.
Office 365 offers email backup to a certain extent – so, in essence, it is not 100% email backup. Instead, it features a shared responsibility design, allowing physical and network-based data center security.
This means that you have to configure your own data retention policies via the security center. However, just like G Suite, Office 365 also offers an automatic 30-day mailbox email retrieval and up to 14 days of individual email retrieval.
Migrating Emails to G Suite or Office 365
G Suite or Google Workspace, among the best email marketing software options, lets you migrate existing emails to your newly created G Suite email accounts. The best part of using G Suite is its email migration and importing feature, which works with most email systems, including Microsoft.
While Office 365 email backup is a bit complicated, its migrating feature is pretty straightforward, just like that of Google Workspace. Office 365 lets you import data from previous email systems after you create a new account. Similarly, you can export email from your Office 365 account if you want to.
Testing Email Delivery
Both G Suite and Office 365 offer reliable email delivery testing functions to troubleshoot your emailing services and to ensure your emailing system works after creating your accounts. Google Workspace lets you troubleshoot email delivery using its Email Log Search (ELS) tool.
This tool offers a selection of testing parameters. These include testing delivery from a G Suite user to a G Suite user, a non-Gmail email provider, and from a non-Google email provider to a G Suite user.
Office 365 has an email delivery troubleshooting diagnostic tool in the Admin Center. All you need to do is enter the sender’s and recipient’s email addresses and other relevant information and then select the tests you want to run.
Configuring Email Clients and Apps
Configuring email clients and apps can help you preset how your email client behaves. For example, you can decide whether the From address or Reply to address should be displayed. Similarly, you can set your inboxes to your custom domain email address to be delivered to a different email, like your Outlook.
Setting Up Email Clients
You can use G Suite or Office 365 to configure third-party email clients. For instance, using their G Suite account, you may want to send and receive emails from other email clients, such as Outlook or Thunderbird. To do so, you must set this up through G Suite’s admin account.
While most third-party emails work with G Suite just fine, it's best to use providers that support OAuth to keep your G Suite account secure. Popular email clients that support OAuth include Samsung Mail, Apple Mail, Microsoft Outlook, and Apple Mail.
Office 365 lets you configure and set up email clients, too. Through Office 365, you can configure POP (lets you sync email with most third-party mail clients), IMAP, and SMTP settings. IMAP settings let you log in via multiple email clients on your PC or mobile device and read the same messages. Similarly, all your actions are synced across these mail clients.
Mobile Device Configuration
Both G Suite and Office 365 support mobile device email client configuration. This means that you can continue with your email communication on your mobile device on the go.
Webmail Access
As mentioned above, both G Suite and Office 365 email client configurations sync your emails across all logged-in devices. So, whether you access the emails on a PC, laptop, or mobile device, you get to access the same information. Further, whatever changes you make are reflected across all the accounts.
Security and Data Protection
Security and data protection are crucial to managing your email operations. The good news is that G Suite and Office 365 offer pretty reliable security and data protection.
Enabling Two-Factor Authentication
Both G Suite and Office 365 let you set up 2-step verification through the admin console. Adding the two-factor authentication allows an extra layer of security for your business correspondence. This, in turn, protects usernames and passwords from falling prey to hackers and other cybercriminals.
Setting Password Policies
G Suite allows you to define and set password requirements for all email users. Most prominently, you can set the minimum and maximum password length in the Password Strength Section of the Security area in the Admin console screen. G Suite also allows the administrator to analyze each user’s password strength to ensure the entire system is always secure.
G Suite also has a Mobile Management system where the admin can monitor and enforce Google’s password policies for Android users who choose to access official emails in different locations. Office 365, on the other hand, has stricter password guidelines and doesn’t allow administrators freedom to define any rules.
Instead, administrators are given guidelines on how to keep the entire communication system safe. Some Office 365 guidelines for administrators include a set 8-character minimum password length, banning common password use, and enforcing multiple-factor authentication registrations.
Collaboration and Additional Features
In addition to offering custom domain email, G Suite and Office 365 offer a full suite of tools your team can use and collaborate with.
Calendar Integration
Both G Suite and Office 365 provide extensive calendar syncing and integration features. Since these two platforms allow access to emails across any device you log into, all your emails and data will also be synced across. This means that you can access all integrated calendar data whether on your PC or mobile device.
File Sharing and Storage
Depending on your package, G Suite and Office 365 offer file-sharing and cloud storage functionalities. This means that every member of your team enjoys sufficient file storage capabilities from their emails and the ability to collaborate with fellow team members through file sharing. G Suite users can take full advantage of Google Drive access, while Office 365 can use One Drive.
Collaboration Tools
Collaboration doesn’t end with just file sharing and storage when you create custom emails through G Suite or Office 365. As mentioned earlier, these platforms give you full use of their tools and several third-party apps.
For instance, Office 365 users will have access to Microsoft Teams as a management and collaboration tool, while G Suite users can depend on Google Workspace. Similarly, users can also use tools, such as Microsoft Excel or Word and Google Docs or Google Sheets, among others.
Troubleshooting Common Issues
G Suite and Office 365 offer quite reliable troubleshooting tools. As pointed out earlier, these platforms provide very effective email delivery troubleshooting functionalities. In addition to email delivery troubleshooting, you can also diagnose DNS configuration and user access issues.
This, in turn, ensures full performance capabilities at all times. With DNS configuration error checks, you can troubleshoot and identify issues associated with mail delivery errors and even spam listings.
Regular Maintenance and Updates
G Suite and Office 365 are perhaps some of the best email domain providers for sufficient regular maintenance and updates. Each platform offers regular updates to all paid custom emails.
However, administrators are also advised to conduct periodic security audits and analyze when to scale up or down. You can find detailed guidelines on regular maintenance and updates from G Suite and Office 365 when choosing them as domain providers.
Best Practices and Tips
G Suite and Office 365 offer a comprehensive full suite of tools for a streamlined custom email communication setup for businesses and teams. Moreover, these platforms are built with powerful security and data protection resources. Yet, it’s always a good idea to equip your team with additional resources to fully use the services.
To harness the power of email marketing, integrate your custom domain email with the right email marketing software. Learn how to optimize your email campaigns and reach your audience effectively.
User Training and Support
For most teams, an administrator always takes care of the email setups and other complex technical issues. Nonetheless, user training is important to guarantee safe and effective use.
Training is extremely important, whether it’s ensuring your team makes full use of the tools offered by each platform or simply keeping company data safe. G Suite and Office 365 also offer active customer support in case you need external help.
Monitoring Email Usage
Administrators should practice continual email usage monitoring to guarantee security and data protection. As mentioned, G Suite and Office 365 feature up-to-date features, allowing users to sync emails across all devices.
This means they can use their emails on personal mobile devices anywhere. Administrators need to reinforce safe practices and guidelines. Even better, both platforms have outlined detailed administrator guidelines on email usage monitoring.
Conclusion
Deciding to take steps to set up a custom domain email is a great way to transform your business for the better. A simple investment in professional custom emails for your business is enough to build your brand’s trust and awareness. Professional and branded communications have also proven to help businesses retain customers.

If you are planning on setting up custom emails for your team, take some time to choose the right domain provider. A good domain provider doesn’t just offer an effortless account-setting process. They also provide additional features for smoother internal and external communication. Moreover, choose a domain service that seamlessly works with your web hosting or registrar service, or pick one that offers hosting services.
If you are wondering which domain user to use to set up custom emails, both Office 365 and G Suite are great candidates. Office 365 is better if you want Microsoft tools and desktop email client functionality. On the other hand, G Suite allows for more versatility and works great for remote team collaboration and users who communicate on the go!


![The Ultimate List Of Email Analytics [2025]](https://ik.imagekit.io/debounce/wp-content/uploads/2022/01/email-analytics-you-should-track-300x139.png)