Do you run professional or business email campaigns? Are you wondering how to implement DMARC records for email validation and security? Did you know? You can set up a DMARC authentication protocol to enhance email engagement and protect your domain against email impersonation attacks.
Hence, in this article, you will learn all you need to know about DMARC records, including:
- The definition of DMARC
- What is Sender Policy Framework (SPF)
- What is DomainKeys Identified Mail (DKIM) authentication
- The value of DMARC to email security
- How to implement DMARC to your DNS provider
- DMARC verification processes
- How DMARC work and more
That said, let’s get started with the meaning of DMARC.
What is DMARC authentication?
DMARC is the shortened form of Domain-based Message Authentication, Reporting, and Conformance, an email authentication system that protects your organization’s email domain from impersonation through email spoofing, phishing, other email scams.
The primary objective of DMARC implementation is to provide better email security and make it difficult for fraudulent actors to carry out email phishing and spoofing attacks.
But before enforcing DMARC records policies, you must first apply:
- Sender Policy Framework (SPF) and, or
- DomainKeys Identified Mail (DKIM) authentication
Why is that so? Because DMARC uses these two email authentication programs to boost email security and deliverability. Therefore, enforce either SPF or DKIM certifications (experts recommend implementing both).
Sender Policy Framework (SPF) and DomainKeys Identified Mail (DKIM) are critical elements that help in protecting you and your email recipients from false impersonation and scams. But what are these terms (SPF & DKIM)?
Let us consider their definitions to understand better how they serve your business’ email marketing interest.
What is Sender Policy Framework (SPF)?
SPF is an email authentication system for validating email senders. It helps Internet Service Providers (ISPs) confirm a mail server’s authority to send emails from your domain or a particular domain. In other words, SPF allows receiving mail servers to verify that you sanctioned incoming messages from your domain.
Consequently, the SPF policy comprises a list of IP addresses permitted to send emails using your domain name. This process helps detect and prevent forgery and other email frauds.
How SPF policy works
The sender policy framework works in three simple steps. And the 3-step process includes:
- Publish your SPF policy (otherwise called SPF records) into the DNS records that describe all legitimate mail servers approved to send emails from your domain. It should contain all IP addresses that you use to send emails.
- Once inbound mail servers receive incoming emails, they refer to the principle for the return-path domain in the DNS report. From there, the servers will match the email senders’ IP addresses with the approved IP addresses in your SPF policy.
- Next, the inbound mail servers will use the standards you specified in your SPF records to determine what action to take. Therefore, based on your submitted SPF policy, the receiving mail servers will decide to either approve and accept the email or reject it.
Generating an SPF policy and publishing it into the DNS record is an acceptable way of protecting your brand domain and email end-users. However, authenticating the source of an email requires DKIM enforcement.
What is DomainKeys Identified Mail (DKIM)?
DKIM is the acronym of DomainKeys Identified Mail, an email verification tool that uses “Public Key Cryptography” to substantiate that emails come from approved mail servers.
Much like SPF, DKIM permits ISPs to certify that the email content from your domain or a verified sender is a genuine copy. Thus, it safeguards a business’s reputation, the mail sender’s name, and subscribers from forged addresses and suspicious emails, such as spoofing.
With DKIM, the mail receiver can verify that the domain administrator endorsed emails from a particular domain. As a result, DKIM has digital signatures that are concealed from end-users and validated by infrastructure.
How does DKIM work?
As stated earlier, DKIM has invisible digital signatures that recipients cannot see. So, the certification solution works by embedding camouflaged signatures into the header area of email messages.
However, the DMARC signing has 3-step processes to it:
1). You (the domain sender) must define elements to add to the DKIM record digital signature, such as the “From:” field address. Other considerations are the subject, body, and more. Note; these factors must stay the same, unaltered. If altered on the way, DKIM certification will not work.
2). The email service you use will convert the text fields you added to the DKIM signature into a hash or key―an operation that regenerates one value to another. After generating a hash string, the system uses a private key to encrypt it, making it exclusively handy to the domain sender.
3). With those in place, the outbound mail server uses the DKIM keys to find the email and decode the signature when you send a message. It does so by identifying the public key that aligns with the private key.
After that, the receiving email server will produce a separate hash string of the elements you added into the DKIM signature. Then, it compares the individual hash string with the decoded key to ensure conformity.
That way, it guarantees that the email message is from the validated domain sender and that the signature components are original and not altered on transit.
After you get the SPF or DKIM records or both configured, you can start your DMARC implementation processes. How? By setting up DMARC records and inserting the policies into your domain text (TXT) records.
But, before addressing the DMARC enforcement processes, you need to understand why it’s valuable for email security and deliverability.
Why is DMARC record vital for email security?
Email marketing is one of the best digital marketing channels for nurturing, acquiring, and retaining customers. For this, 87% of B2B marketers use emails for content distribution. That’s according to data from Content Marketing Institute.
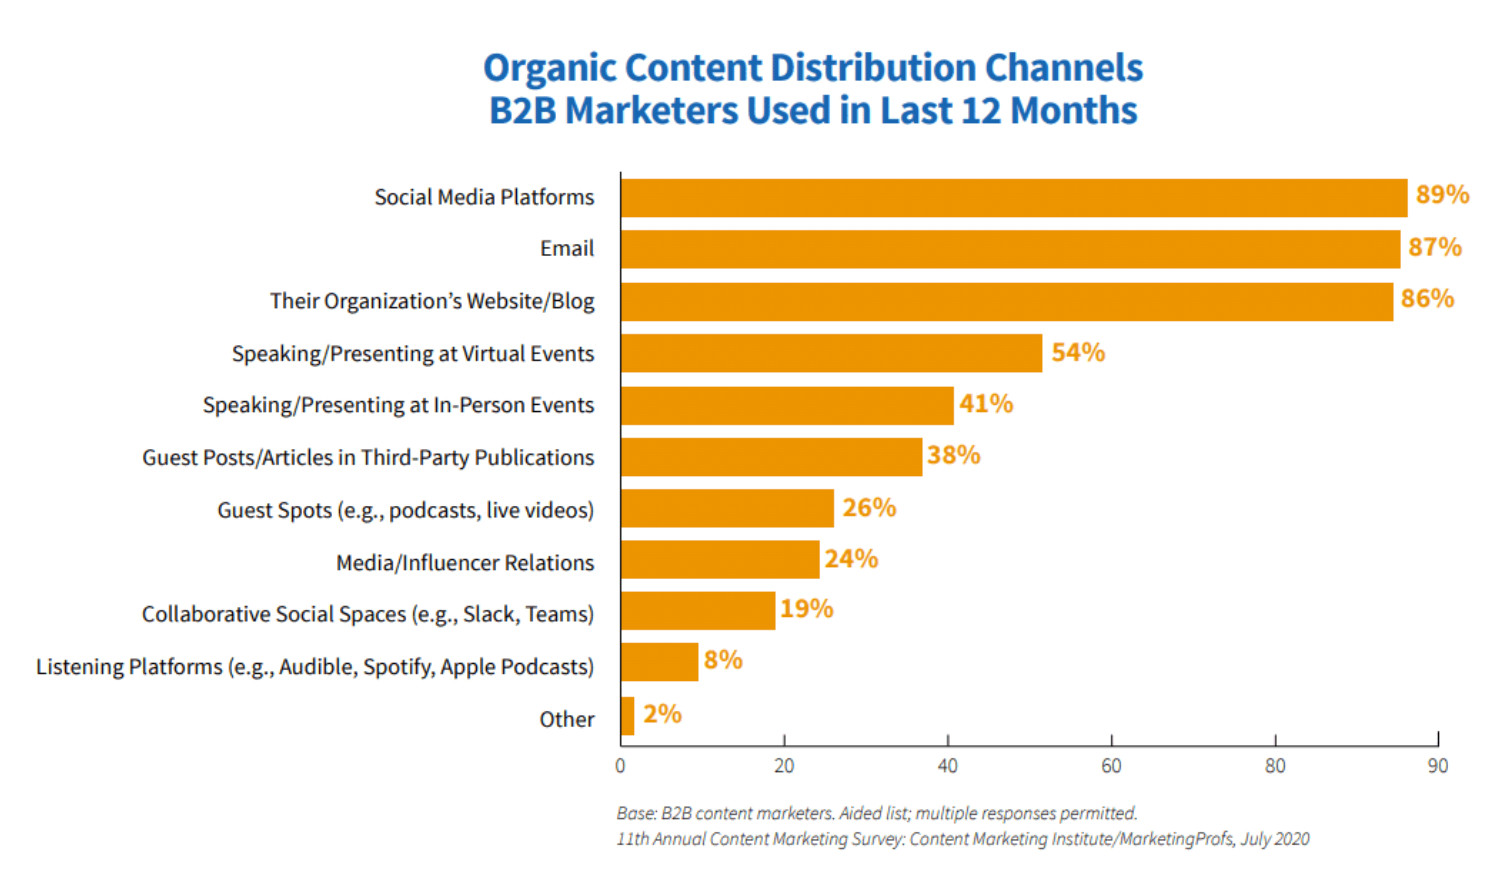
Source graphic via CMI.
Also, 77% of respondents use email newsletters to generate the best content marketing results. Therefore, with so much emphasis on email campaigns, protecting your email senders and subscribers is crucial. That is where SPF, DKIM, and DMARC play a critical role.
DMARC enforcement is vital to email security because it improves email deliverability and reduces the risk of email threats to recipients’ inboxes. With this certification solution, scammers will find it challenging to impersonate your brand identity in customers’ inboxes.
The benefits of implementing DMARC records:
- DMARC protects you and your business against business email compromise (BEC), domain spoofing, email impersonation, and email phishing attacks
- Enforcing DMARC enhances email sender reputation.
- DMARC helps improve your email deliverability rate by 10% over time
- Applying DMARC to your domain server guarantees that your emails never get flagged as spam, which ultimately boosts open rates
Moreover, businesses can conveniently establish a record of an authorized person to send business emails from your domain. It enables you to avoid fraudulent activities. How? When you publish your domain’s DMARC record into the DNS entry, all receiving email servers will validate incoming emails to ensure credibility before delivery to receivers’ inboxes.
Consequently, emails that do not pass the check will be subject to two possible actionsーquarantine or reject the message to block malware and protect recipients from scam attacks. Also, it prevents unlawful use of your email domain.
How to implement DMARC records to your DNS provider
Since you’ve successfully installed SPF and DKIM, you can now set up and implement DMARC records to your DNS provider.
The setup and implementation processes:
1). log in to your DNS provider and locate the field to create a text (TXT) record in your DNS for _dmarc.[your-domain] with your DMARC record. (However, you may only need to edit already created texts with your TXT records).
2) Use the recommended tags: v=, p=, fo=, rua, and ruf tags.
- v=DMARC1 protocol version.
- p= represents various DMARC policy models. For instance, the p=none is the monitoring system. It lets you gather valuable data on your entire email system and helps you define what emails are authenticating and those not certified. Other policies are “p=quarantine and p=reject.”
- fo= is fr forensic reporting; it tells mail service providers to send reports of messages that fail the SPF and DKIM checks.
- rua= is where you add your address for receiving reports that help you determine and approve verified emails.
- ruf= is where you add the address for receiving forensic reports to evaluate phishing emails and other online mail attacks.
3). Use the following word order for your DMARC records: v=DMARC1; p=none; fo=1; rua=mailto:[email protected]; ruf=mailto:[email protected] (You will be receiving aggregate forensic reports at the addresses you entered).
4). It’s time to implement your DMARC report in your DNS host provider.
*Important* Take at least one week to monitor your business domains to ensure that your domain emails are authenticating correctly. After that, you can apply p=quarantine or p=reject policy.

Source: Google Workplace Admin
How to verify DMARC records
After set up and enforcement, it’s essential to verify that your DMARC record is working. Don’t worry; it’s not rocket science, and you need no coding to verify your domain. Several free DMARC record inspector tools will help you confirm whether you published your TXT records correctly.
Therefore, pick your choice DMARC record inspector or lookup tool, enter your domain, and hit the “Scan Your Domain,” “Scan now,” or “Authenticate Your Domain” button. It analyzes your domain and shows you detailed results.
For example, I used the EasyDMARC domain scanner to run a check on GetResponse. And below are the results:
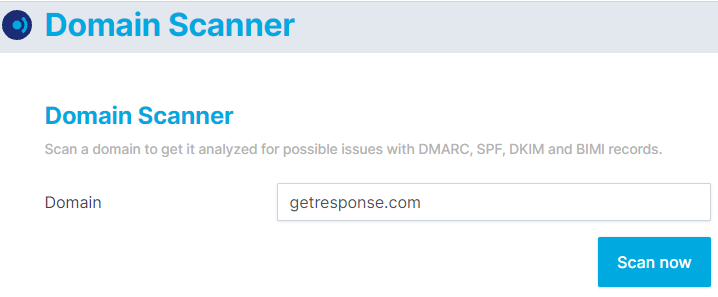
As you can see in the screenshot above, type your domain name and click the “Scan now” button.
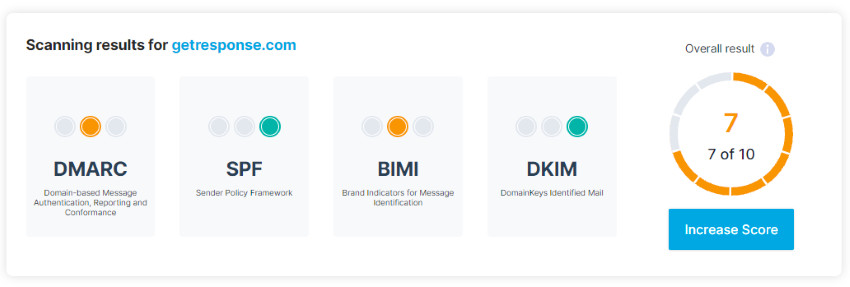
The DMARC checker will scan your domain and present a comprehensive result with a score of 1-10. From the image above, you can see that Getresponse’s domain scored 7-out-of 10. It means that the site owner needs to work on their authentication processes to get better results.
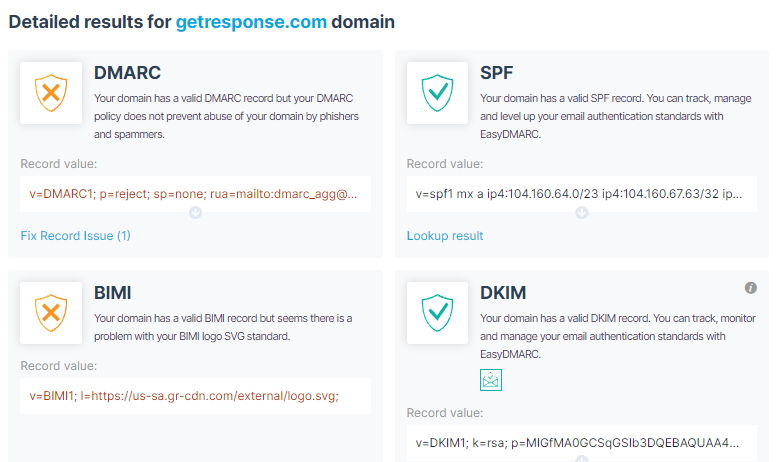
This detailed performance sheet reveals that Getresponse’s DMARC and BIMI records have issues, while SPF and DKIM are excellent. Thus, whatever email you’re sending (transactional or professional email messages), apply this system to protect your domain.
Therefore, select a DMARC record analyzer that works for you and test your domain after configuration to ensure that your text record is legitimate and published correctly.
How does DMARC work?
As indicated earlier above, DMARC leverages two other email authentication systems─Sender Policy Framework (SPF) and DomainKeys Identified Mail (DKIM), to boost email certification. DMARC uses these additional certification tools to signal whether a message-From domain is secured and validated by SPF and DKIM.
However, DMARC does not directly resolve whether sender emails are fraudulent or spam. Instead, it demands that emails pass SPF or DKIM authentications. Thus, DMARC checks the sender domain and ensures that it aligns with the validated domain name.
But if the confirmation report indicates that the emails did not pass either SPF or DKIM authentications, DMARC tells receiving email servers what actions to take. The receiving email client will execute the following three DMARC policies if the sender domain fails the check:
- Monitor (p=none): Deliver the email as usual with a warning message, and add it to a report of emails that did not pass the SPF or DKIM tests
- Quarantine (p=quarantine): Send the email to quarantine (spam or junk folder) for manual approval before delivery
- Reject (p=reject): Reject the email or subject it to a custom policy (these emails get blocked/deleted and never reaches recipients’ inboxes)
As a brand domain administrator, you can select your desired DMARC policy and publish your policy preferences in the DNS as text (TXT) records. The TXT record allows you (the domain administrator) to insert text into the DNS.
You can see a sample of a DNS TXT record here. Besides, the Domain Name Server has two essential applications:
- Email spam prevention
- Domain ownership verification
Ultimately, implementing DMARC can help you improve email bounce and increase your marketing performance.
What is a DMARC policy?
In the above section, you learned that you must create a DMARC policy and enter it into the public DNS as a domain administrator. But what exactly is a DMARC policy?
A DMARC policy is a mechanism that indicates how an email client or reader provides feedback to the sender’s domain concerning email messages that pass or fail the SPF or DKIM verification check or both.
When you create a DMARC implementation policy, you’re telling email clients what steps to take if an email claiming to come from your domain does not pass the certification checks.
Based on that, the email receiver can reject, quarantine, or approve the message. I already outlined the three DMARC policies above; please, re-evaluate them carefully.
Which DMARC policy should you use?
Are you thinking about which policy program to use? The three have varying functions, and it would help if you select the right one for your domain. Many would go for the “reject” policy since it blocks or deletes unapproved sender emails, preventing malware and spam emails from reaching customers’ inboxes.
But it would be best to start with the “p=none” policy specification and gradually progress to the others. Why? Because this policy type does not stop any messages from entering a receiver’s inbox.
Instead, it allows emails into receivers’ inboxes, track those sent from your domain, and gives you feedback accordingly. In that way, you can maintain email deliverability while pinpointing which emails are genuine or illegitimate.
Next, as your email undertaking progresses, and with valuable data, you can move up to the “p=quarantine” policy. Instead of allowing all messages into the inbox, it quarantines suspicious and unauthenticated emails into the spam or junk folders. The p=quarantine approach will enable you to approve emails as legitimate manually.
Furthermore, you can use the DMARC “reject” policy to block unapproved messages. But to ensure your emails get to recipients’ inboxes, you should whitelist all your email service providers. Whitelisting email senders guarantees that your marketing emails reach recipients’ inboxes.
Otherwise, the p=reject policy will prevent any emails from unconfirmed domain senders and all non-whitelist sending providers. For example, you’re likely using one or more of the following email tools:
- G Suite
- Office 365
- Getresponse
- Mailerlite
- ConvertKit
- HubSpot Marketing Hub
These software apps work in similar ways, including sending emails. So, if you’re using any of these or their alternatives, it would help if you first safelist them before opting for DMARC’s “p=reject” policy.
Wrap up
As a business owner, it is understandable that you send marketing emails (commercial or transactional) campaigns to drive your business. And that’s because email marketing enables you to communicate with prospects and customers.
But how safe is your email domain from spoofing, phishing, and other email attacks? Email phishing is one of the biggest online threats to your business.
Research reveals that in 2020, 75% of businesses experienced phishing attacks worldwide, with 74% successful email phishing attacks in the US. Consequently, it’s critical to take measures to safeguard your business domain. Hence, the need for DMARC record authentication.
It helps protect your email domain, stop email impersonation, and block email phishing attacks. This validation system also protects your brand reputation and improves email deliverability. Therefore, apply the tips above to help safeguard your business domain.
However, if you’re not sure how to set up and implement DMARC records, please ask your company’s DNS administrator for help!


![The Ultimate List Of Email Analytics [2025]](https://ik.imagekit.io/debounce/wp-content/uploads/2022/01/email-analytics-you-should-track-300x139.png)


